I'd Rather be at the Beach Acrylic Painting

Summer is coming, and I know a lot of us are wondering what it holds. You might have had plans to hit up a beach in the next few months. To help you keep those beach dreams alive, and keep you relaxed thinking of that surf washing in and out, feel free to paint at home using the following tutorial that I had put together for a paint party fundraiser at one of our local schools. Even better, call a few friends or family members and host your own virtual paint party. If you need canvases, let me know and I can dig into my stock pile.
Take Care everyone!
SURF LINE
We will first draw a light pencil line across our canvas to separate out water from our sand. PRO TIP 1: Draw your line on a diagonal, rather than straight across - we humans find this much more dynamic. PRO TIP 2: Hold your pencil at the very end (at the eraser) this will take away some of your hand control and help you make a convincing, just right, wobble in your surf line.

WATER UNDERPAINTING
Using your a medium to large brush grab some of that great deep blue hue. Starting at the top of your canvas, working in the direction of that diagonal, scrub that blue paint into the canvas. Come about a third of the way to your surf line and grab some of that turquoise (no need to rinse your brush) - scrub that into the last 1/2 " or so of your deep blue, blending them directly on your canvas. Continue to bring that turquoise down towards your beach, grabbing your white about 2/3's of the way down. Blend the white into the turquoise like we did above, painting it all the way down to that wobble surf line. PRO TIP 1: Don't get hung up on that surf line PRO TIP 2: Working a bit faster is going to ensure that your paint is wet enough to blend together. If it's not blending - don't sweat it, this is the underpainting - we are going to do this all over again in a couple minutes, and now you've had a chance to practice.


SAND UNDERPAINTING
Now that we have an underpainting of the water established we are going to lay some foundation for our beach as well. Grabbing a different medium sized brush (dry!) switch up your color palettes and direct your attention to the white, brown, and what looks like a mustard color (white, burnt umber, and raw sienna in artist color lingo). Double load that brush - Grab some white on half your brush, raw sienna on the other half and scrub that into your canvas. We want a lot of different tones (lights and darks) of color here. Even grab a teeny tiny amount of burnt umber and brush that in there as well. Like with the water, no worries - this is an underpainting. Have fun and don't get too hung up on it. PRO TIP: That burnt umber adds great interest, but it also tends to gray out your color. Use it sparingly.

TAKE A STEP BACK ... check out what you got going on so far.
RINSE REPEAT
Here is your shot to do it all over again. Rinse repeat - go ahead and start again with the deep blue and blend down to the waters edge using turquoise and then white. The underpainting will provide some depth on our painting, making it look more realistic.
Same thing with your sand, any areas that need a bit more blending or areas of interest?
MAKING WAVES
Grab your sponge and make sure you have pure white paint. Using the sponge side (not scrub side) dip it into your clean white and dab on the side of the plate or paper towel until you have a nice texture left behind. Use your sponge to dab along your shoreline, staying on the water side but encroaching on the beach. PRO TIP 1: Change the direction of your sponge dabbing so it doesn't start to look like a stamp. PRO TIP 2: Dab heavier right at the shore and fade it off as you creep back into the ocean to give that foaming effect. PRO TIP 3: Create a another uneven surf line just behind the first on shore. PRO TIP 4: If your canvas is set up to touch another canvas, make sure that your white paint goes down the edge a bit to create a seamless edge.

SANDY TEXTURE
Don't put down that sponge quite yet. Switch palettes and grab some more white and raw sienna (mustard tone) and dab. Create a sandy texture by grabbing a variety of those three beach tones from before and changing the direction of your sponge.
WAVES HAVE SHADOWS
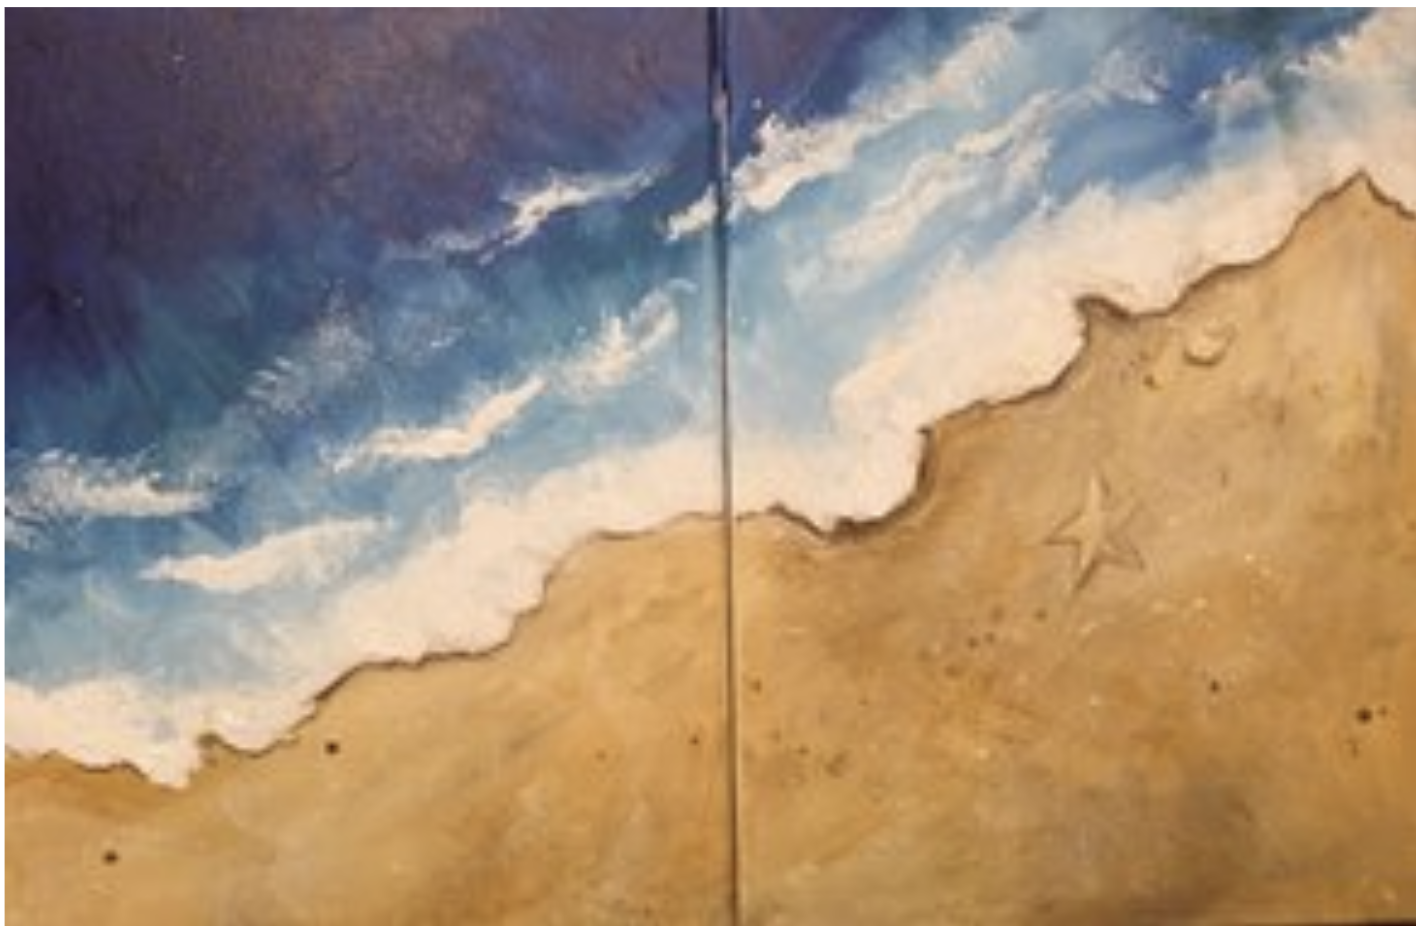
Since the wave is washing up on shore it will have a slight shadow underneath it. You can see the difference this makes in the picture below. Using your thinest brush, load it up with burnt umber (darker brown) and trace underneath the waves edge. Make sure to follow your foamy surf line, you want to maintain some of that wobble you worked so hard on. PRO TIP: If you feel confident, blend out that dark brown a bit, as the shadow would fade a bit as it gets farther away from the wave.

TAKE A STEP BACK
Do you need a little splatter paint to break up your sand and add a little more interest? Get some water on your brush (this is really the only time we are going to do this) Triple load your brush and gently tap your loaded brush over top a pencil or different clean brush. Start gentle and block off any area (water) that you don't want splattered. Remember, if you get too much, we just paint over it - no sweat.
ADDING DETAILS
Now that we have a proper sand and surf, we need to add some areas of interest and small details. Keeping perspective in mind, there are a variety of things you could paint in; small rocks or pebbles, shells, sea star, sand dollars, shapes or words written in the sand.
MAKE A CHOICE
Choose to either write a word or shape in the sand or paint an object on the beach. Sketch out your object or word on your sand and look below for directions.
PRO TIP: Before sketching out the basic shape of your object(s) think about your composition.
Composition: the artistic arrangement of the parts of a picture.
You want your objects placed in a pleasing way. A rock near the shoreline, maybe another further down the canvas, a small shell not too far away. Don't put all of your detail in one corner.
PAINTING OBJECTS IN THE SAND
1. We are going to use a dark, medium, and light values to make our beach objects look dimensional. Mix your three values below
Burnt Umber will be our dark value
White + a little burnt umber will be our medium value ( should look like a light tan)
White will be out light value
2. Paint your object in your light value (white) with maybe a touch of the tan color.
3. Thinly trace around your object with the medium shade.
4. Take your dark value and add a shadow on the bottom of your object, by tracing around the bottom edge.
All objects are going to be slightly lighter on top with the light hitting there first, and add a little shadow underneath (like we did with the waves).

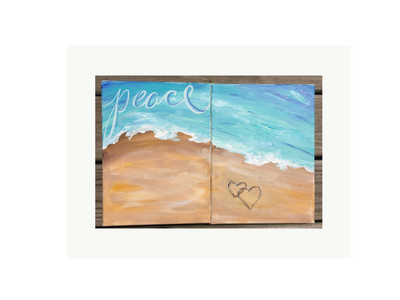
WRITING A WORD OR SHAPE IN THE SAND
1. We are going to use a dark, medium, and light values to make our letters or shape look dimensional. Mix your three values below
Burnt Umber will be our dark value
White + a little burnt umber will be our medium value ( should look like a light tan)
White will be out light value
2. Paint your letters in your dark value
3. Go over your shape or letters again now with the your medium value, Trace around 2/3s of your letters or shape with the your medium value - we are giving the impression that there are areas that are below the sand and on the top of the sand, these values help the illusion.
4. Take your light value (white) and touch the corners and edges of your medium value, should cover about 1/3 of the medium value.

There is no wrong way to do any of this. Below there are a variety of ways you could handle it, and I bet their will be 50 more ideas tonight. Have fun and remember we can always paint over it and start again. Acrylic paint is wonderfully forgiving in that way!